What is PCClean Pro?
PCClean Pro is rogue program, which recently infects millions of computers. Like many other fake antivirus programs, PCClean Pro can not provide any protection to your computer. All it what to do is convince you that your PC need it to remove various computer threats. In fact, all you should do is to remove PCClean Pro as soon as possible.
Why I have to uninstall PCClean Pro?
PCClean Pro is quite powerful and many security programs can not remove it completely. The rogue program constantly opens a backdoor to virus and Trojan and renders your system at risk. If your security fail to remove the rogue program, you should try to uninstall it completely.
How to uninstall PCClean Pro manually?

1) Find the “start” button on the lower left corner of your monitor, and then click it.
2) Find and double click the button “Control Panel”.
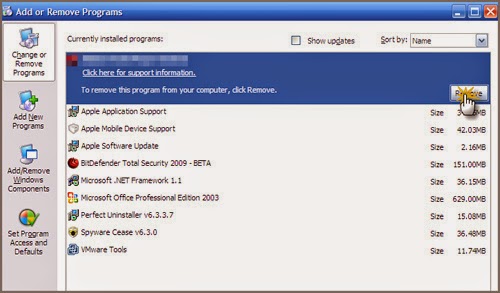
3) Find “Add / Remove Program” icon in the control panel, and then double click it.
4) Find the PCClean Pro icon in the list, and then select it to start uninstalling it from your computer.
Don’t be too happy when you finished all these four steps, because for some reasons, PCClean Pro will be failed to be uninstalled because some reasons and this happen often. If you came up with this problem, I am afraid you have to uninstall PCClean Pro from your computer’s registry.
You are not suggested to try this method manually for it is difficult to discriminate which registry belongs to PCClean Pro, and which one not. Forgetting to delete one of PCClean Pro’s registries will remain PCClean Pro in your computer. The worse situation is that when you mis-delete even if one registry which not belong to PCClean Pro, but it is crucial for the system, you will mess up your computer. That will be a nightmare, right?
A professional uninstall software can save your time and prevent you from messing up your PC. It will dig into the system to find out PCClean Pro’s corresponding registry one by one, and then delete them together and completely. PCClean Pro will be removed from your computer completely through this method. Compared with so much searching work, you just need to click your mouse several times to uninstall PCClean Pro from your PC by using Perfect Uninstaller.
Now move your mouse here, take the first click to free download Perfect Uninstaller to your computer. And PCClean Pro will be disappeared completely from your computer after several minutes.
PCClean Pro is rogue program, which recently infects millions of computers. Like many other fake antivirus programs, PCClean Pro can not provide any protection to your computer. All it what to do is convince you that your PC need it to remove various computer threats. In fact, all you should do is to remove PCClean Pro as soon as possible.
Why I have to uninstall PCClean Pro?
PCClean Pro is quite powerful and many security programs can not remove it completely. The rogue program constantly opens a backdoor to virus and Trojan and renders your system at risk. If your security fail to remove the rogue program, you should try to uninstall it completely.
How to uninstall PCClean Pro manually?
1) Find the “start” button on the lower left corner of your monitor, and then click it.
2) Find and double click the button “Control Panel”.
3) Find “Add / Remove Program” icon in the control panel, and then double click it.
4) Find the PCClean Pro icon in the list, and then select it to start uninstalling it from your computer.
Don’t be too happy when you finished all these four steps, because for some reasons, PCClean Pro will be failed to be uninstalled because some reasons and this happen often. If you came up with this problem, I am afraid you have to uninstall PCClean Pro from your computer’s registry.
You are not suggested to try this method manually for it is difficult to discriminate which registry belongs to PCClean Pro, and which one not. Forgetting to delete one of PCClean Pro’s registries will remain PCClean Pro in your computer. The worse situation is that when you mis-delete even if one registry which not belong to PCClean Pro, but it is crucial for the system, you will mess up your computer. That will be a nightmare, right?
A professional uninstall software can save your time and prevent you from messing up your PC. It will dig into the system to find out PCClean Pro’s corresponding registry one by one, and then delete them together and completely. PCClean Pro will be removed from your computer completely through this method. Compared with so much searching work, you just need to click your mouse several times to uninstall PCClean Pro from your PC by using Perfect Uninstaller.
Now move your mouse here, take the first click to free download Perfect Uninstaller to your computer. And PCClean Pro will be disappeared completely from your computer after several minutes.


 RivaTuner is the most powerful tweaking utility for NVIDIA and ATI display adapters running under Windows. The purpose of this utility is to give you access to all the undocumented features of Detonator and Catalyst drivers. Drivers have a lot of undocumented registry entries. In general, they cannot give you big performance boost but they can improve image quality and solve some compatibility problems. RivaTuner will help you to change all undocumented registry entries. It supports all versions of Detonators (now called ForceWare) drivers under Windows.

 KontextViewer is Konvertor add-on. The fastest way to display and convert between image, videos and audios formats. You may select the files you wish to convert, right click, choose the format and you’re done.
 Command and Conquer, one of the most popular strategy

 What is SafeGuard 2009?

